
Before choosing another Adventure Blocks route, check the encounter and the conditions shown in your game. Campaign links boards through routes and keeps your progress: the decision continues after you place an encounter’s last piece.
What to check when returning to the map
Start with your current position. Review the options and encounter information your game makes available. Rather than choosing only by an island’s appearance, connect the choice with what you want to tackle and your current equipment.
- Find where your campaign continues.
- Review available options and their visible conditions.
- If your game shows an objective, review it when available.
- Check your relics if their effects matter to your plan.
An example from the official images
A Google Play promotional image shows an Astral contract screen with a stated sequence of node types and a warning that losing breaks the chain. It also shows route options and conditions. This is published game information, rather than a paper puzzle or a rule invented for this guide.
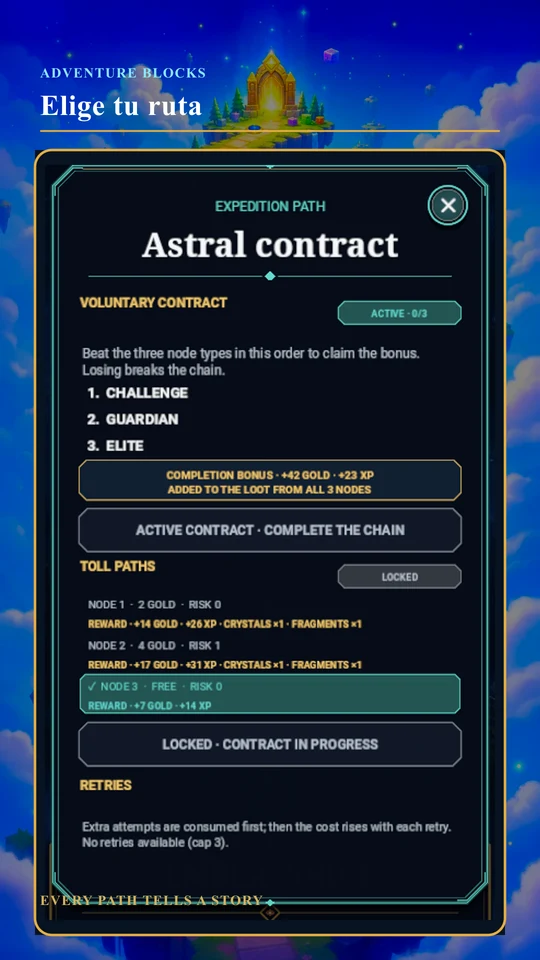
In that example, node 1 shows a cost of 2 coins and an advertised reward of 14 coins and 26 XP; node 3 is marked free, with 7 coins and 14 XP. The section says it is locked while the contract is in progress: comparing the figures does not establish that either path is selectable. Check your own game’s conditions and options. Do not transfer costs or rewards from one image into every playthrough: read the values and conditions in your version.
A route is not a guarantee of victory
A route determines what you tackle; the encounter still requires decisions on its own board. If you want an independent session today, you can choose Classic rather than Campaign.
To continue the mobile adventure, visit the Adventure Blocks introduction or its official Android listing on Google Play.